These days, CDs are retro-tech, provoking feelings of nostalgia for
the days when music and software came on them. But even today, there
might be times when you need to burn a CD with your Mac. If you’re
making a simple audio CD or backing up files to a disc, you don’t need
any special CD burning software. This is because both abilities are built into macOS (formerly OS X).
To make an audio CD on your Mac,
all you need to do is make a playlist in iTunes with the songs you want
to burn. Then right-click on it and select “Burn Playlist to Disc.” A
few minutes later you’ll have a brand-new audio disc that you can use in
any CD player. Making a data disc is equally simple. Just put the files
you want to burn into a special folder, right-click and select “Burn
Folder to Disc” from the side menu.
Of course,
you’ll need to make sure that your Mac has an optical drive that’s
capable of burning discs to take advantage of these native features.
Since new Macs no longer come with these drives, it’s likely that you’ll
have to purchase an external unit and connect it to your machine before
you can burn a CD.
These tools are
good as far as they go. However, if you want to do more than simply
burn a music album or back up files to a disc, you’ll need to invest in
more advanced Mac CD burning software. The best Mac CD burners go far
beyond simple audio and data discs. They can also rip content off CDs
and DVDs, convert audio files, burn disc images, create menus, and much
more.
The Best CD Burning Software for Mac
We evaluated
the best Mac CD burning software available on the market today. At the
end of our analysis, we determined the following products are the best
you can buy.
This
software is a full-bodied disc authoring program that goes far beyond
burning music albums and files to CDs. It enables you to capture content
from almost any source. In addition to capturing audio from
microphones, you can get rip, copy and capture sound from records,
cassette tapes or online audio streams.
It
also has editing tools such as Toast Audio Assistant and Toast Slice,
which enable you to customize, edit and enhance your clips before you
burn them onto a disc. You can use the program to convert audio and
video into almost any format or optimize it for playback on the iPad or
iPhone.
And
it does more than CDs. The software also has tools for authoring,
copying and burning DVDs and Blu-ray discs. You can use this program to
build custom movie discs, complete with menus, or copy ones you already
own. You’re not limited to making discs either; this program can also
optimize your projects for and upload them to sharing sites like
YouTube, Facebook and Vimeo. If you need a heavy-duty authoring program,
it’s hard to go wrong with Roxio Toast.
If
you’re looking for a simple Mac CD burning application, NTI Dragon Burn
is probably what you want to buy. It’s not as comprehensive as Roxio
Toast, but it’s much more straightforward, and you can easily burn both
audio and data CDs and DVDs. All of its tools are accessible from the
main screen of the interface, and it’s so simple that anyone can use it.
Making
audio and MP3 CDs with this program only takes a few clicks. You can
easily drag and drop any audio files you have into the interface, click
the Burn Disc button and have a new music CD in about 15 minutes that
will work in any CD player. Making a data disc is equally simple and
follows the same workflow as making a music CD.
This
software is available in the Mac App Store. But if you want to try it
out before you pay for it, go to NTI’s website and download the free
trial that you can use 10 times to see if it’s worth the price tag.
This
software isn’t limited to burning CDs. When you launch the program, the
first thing you do is select what kind of disc you want to make. You
can create discs from audio and MP3 CDs to data CDs, DVDs and Blu-rays.
You can also create video DVDs and Blu-rays. Additionally, you can copy
discs that aren’t encrypted and create disc images to store on your hard
drive.
Express
Burn sits in the Goldilocks zone between Toast and Dragon Burn. It’s
not as straightforward as Dragon Burn but not as complex as Toast. You
can do more than you can with Dragon Burn but less than you can with
Toast. It falls right in the middle ground when it comes to
functionality and usability.
This
software also has a free version that you can download from NCH
Software’s website. The free version may meet all your needs without you
having to upgrade to the full paid version.
Burning a CD
with your Mac is simple once you know how. If you’re creating simple
audio or data discs, you don’t even need special software, since those
abilities are already built into macOS. However, there are Mac CD
burning programs you can buy that do more than that. You can even get
free versions or trials to see if they’re worth paying for.
Blue Screen of Death (BSoD)
Many people think of blue as a calming color; however, when it comes up
on your computer screen with a bunch of white text, it probably has the
opposite effect. The blue screen of death (BSoD or STOP Error) may
appear to be one of the scariest computer problems you'll come across.
However, all your computer may need is for you to reboot it. This STOP
error appears on your screen for a variety of reasons: failing hardware,
damaged software, corrupt DLL files, problems with drivers and more.
The remedy for a blue screen of death depends on the original problem.
The screen provides you with codes that can help you identify and fix
your computer problems.
Missing DLL File
Dynamic-Link Library (DLL) files house information for your operating
system on how to perform certain functions. Occasionally, your computer
loses DLL files or something damages them. When your PC can't read the
particular DLL file, it doesn't know how to respond in certain
situations. You may have a missing or corrupt DLL file if you receive an
error message every time you perform a certain function, such as
saving. If your computer problems are stemming from missing and damaged
DLL files, you can restore them by downloading them back onto your PC.
Applications That Won't Install
If you're having trouble with an application not installing, it may be
because your computer doesn't have enough hard drive space. If this is
the case, you need to free up some space. This is one of the computer
problems that's, well, least problematic. You can free up some hard
drive space by getting rid of files and folders you don't need. These
may be temporary files, duplicate files or data for software you've
uninstalled.
Applications Run Slowly
There are several reasons software might be running at turtle speed. You
may have computer problems that involve your operating system or an
application, your operating system might be missing updates or your
computer doesn't have enough hard drive space. If you don't have enough
hard drive space, you can scan, clean and optimize your hard drive.
Abnormal Applications Behavior
Computer problems that involve applications acting strangely oftentimes
leave you wondering what has happened. Your application has been working
just fine, but now, seemingly without reason, it is doing something
strange.
For
instance, your Word document will no longer show the top margin of your
document. It still says it's there, and when you print it, there's not a
problem. You just can't see it on your monitor. If this is happening,
you may want to restart your computer. Conducting an internet search for
the type of problem you're experiencing or consulting your user manual
may help you as well.
Whether you’re dealing with your dad’s decade-old computer or your own
custom-built gaming rig, troubleshooting PC problems is a part of
everyday life. Before you make that $50 support call, though, try your
hand at ComputerTopRepair. We spoke to some of the best support reps
in the business about the most common problems they fix—and how you can
do it yourself.
Try this first
I know it sounds like a no-brainer, but before you do anything else,
restart your computer. Matthew Petrie of Falcon Northwest technical
support says that most of his customers solve their problems with this
simple step. “This long-standing maxim can work wonders,” says Petrie.
Regularly
checking for operating system updates is important, because forgetting
to do so could significantly impair your PC’s performance.
While you’re at it, make sure that your operating system is fully
updated by running Windows Update. Neglecting updates could deprive you
of important bug and performance fixes.
If you’re having problems with a peripheral, try switching it on and
off. If that doesn’t work, try disconnecting and reconnecting the
device. As a last resort, download the latest drivers and perform a full
reinstall.
My computer is too slow
The first step to fixing a slow computer is to verify that your machine
is the actual source of the problem. Videos that seem to buffer forever,
and websites that take ages to load, may not be your computer’s fault.
Geek Squad agent Derek Meister claims that many people mistakenly
identify a slow system as the problem when “it’s actually not the
computer, [but] their broadband connection.” See “Downloads are taking
forever” below for instructions on how to use Speedtest.net to diagnose a
slow connection.
If the problem is your PC, check whether you have plenty of free space
on the hard drive holding your operating system. Windows needs room to
create files while your system is running. If your hard drive is maxed
out, performance suffers. Now is the perfect time to clear some space.
If your computer’s operating system resides on an overstuffed C: drive, clearing out some space could boost OS performance.
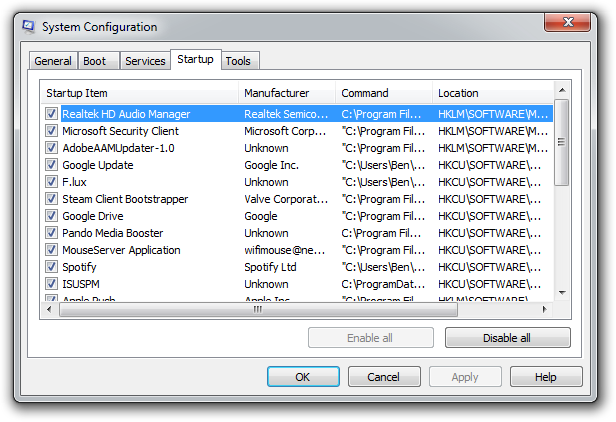
Microsoft’s System Configuration tool is your next-best bet for tackling
slow performance. Many applications launch automatically when your
machine boots up, which can stretch out boot time—especially on older,
slower PCs. Make a habit of trimming the startup items. Open the tool by
pressing Windows-R, typing msconfig, and pressing the Enter key.
Checking the Startup Item and Manufacturer columns is the best way to
figure out which potential performance-killers you can safely disable.
Avoid messing with any of the services and programs that have Microsoft
Corporation listed as the manufacturer. Items such as AdobeAAMUpdater,
Google Update, Pando Media Booster, Spotify, and Steam Client
Bootstrapper are all fair game. Regardless, err on the side of caution:
If you’re not sure what the program or service does, don’t disable it.
Windows’ System Configuration Tool lets you disable programs and services that automatically start when you boot your computer.
Once you’ve made all your changes, click OK and restart the computer. It should boot up quicker and feel noticeably faster.
Downloads are taking forever
Speedtest.net is your best
friend when you're having connectivity problems. Run a speed test to see
what your download and upload speeds are—ideally they should be at
least 50 percent of your Internet service provider’s advertised speeds,
with a ping under 100 milliseconds.
If the speeds seem solid, make sure that you aren’t inadvertently
downloading or uploading anything. Many torrent downloading programs run
in the background and minimize into the system tray instead of the
taskbar.
A good speed test should give you an accurate assessment of your ping, download speed, and upload speed.
Check your network hardware. Updates for network cards aren’t all that
common, but if your card’s manufacturer offers a newer driver, download
it. Resetting your router and modem can help with connection problems,
too. Most routers and modems have reset buttons, but pulling the power
cable for a second or two can do the same thing. Don’t cut the power for
much longer, or the hardware may reset itself to factory defaults.
Still having problems? Call your ISP, which can tell you whether the
problem is on your end. As a last-ditch measure, the ISP could reset the
master connection to your home.
My machine keeps restarting
Hardware problems are hard to diagnose and solve. First, confirm that
you aren’t just getting the latest wave of Windows updates, which can
automatically restart your computer during installation. Then work on
updating all of your critical system drivers. Your graphics card,
motherboard, and network card drivers are crucial.
“Sometimes it can be viruses, sometimes it can be adware, sometimes it
can be overheating, and sometimes it can be something as simple as
making sure your video card is updated,” Geek Squad’s Meister says.
Is your computer making weird noises? If you’re lucky all you’ll need to do is give the machine a thorough cleaning.
Modern computers have safeguards that shut down the system if a
component is overheating, which can be the cause of frequent restarts
when you’re running resource-intensive programs or video games.
Pop-up ads are appearing on my desktop
If you’re not running your Web browser and are still getting pop-up ads
on your desktop, you’ve most likely installed adware—a program that
displays unwanted ads. Although benevolent adware exists, most of the
time adware is up to no good. Getting rid of it isn't easy. “There’s a
ton of little system-utility tools out there that promise to clean up
everything, with names like PC Speed-up, PC Speed Pro, PC Speedifier,”
Geek Squad’s Meister says. “A lot of times those programs are not going
to do much. Some programs will work, others are snake oil.”
Avoid
downloading programs that offer to speed up your PC or clean up your
registry. Instead, use a trustworthy adware scanner like the free
version of Malwarebytes' Anti-Malware tool.
Running a full scan with credible antivirus software is your first step.
If that program doesn’t find and remove the adware, turn to Malwarebytes Anti-Malware Free,
a great utility for removing all types of malware. Just make sure to
disable your standard antivirus software before running it.
“Multiple antivirus programs working at the same time will often result
in problems,” Falcon Northwest’s Petrie says. “You only want one active,
real-time antivirus scanner installed, but it doesn’t hurt to run an
additional ‘on demand’ virus or malware scanner.”
Searching online for the name of the advertised product can sometimes
yield solutions from fellow victims. If all else fails, there’s always
the nuclear option: a complete system reinstall. It might take a long
time, but it’s the only surefire way to remove adware or spyware.
Remember to back up all your personal files.
Google doesn’t look right
Browser hijackers are a particularly nasty breed of malware. Such
programs take over your Web browser and can stealthily redirect your
Google searches and other queries to fake pages meant to steal your
personal information or to further infect your system.
Running a real-time antivirus utility is the best way to stay safe. If
your browser has already been hijacked, uninstall the browser and use
your antivirus program in conjunction with Malwarebytes to remove the
intruder.
My Wi-Fi keeps disconnecting
Spotty wireless connections can be a puzzler. Is it your computer? Your
router? Your ISP? Try a few things before calling your Internet service
provider.
Windows Network Diagnostics may not always solve your problem, but it will usually point you in the right direction.
Confirm that your computer is within range of your wireless router. Weak
signals mean weak connections. Next, make sure your PC’s wireless card
has the latest drivers. Try letting Windows troubleshoot for you by
right-clicking the Wi-Fi icon in the taskbar and selecting Troubleshoot problems.
I keep seeing ‘There is a problem with this website’s security certificate’
Sometimes the biggest problems have the easiest fixes. According to
support technicians, the lion’s share of issues are due to an incorrect
system clock.
The problem is probably with your computer.
Website security certificates sync up with your computer’s clock. Old
computers in particular run the risk of having a dead CMOS battery—the
watch battery in your computer that keeps its system clock ticking.
Click the clock in the system tray and select Change date and time settings to correct any issues.
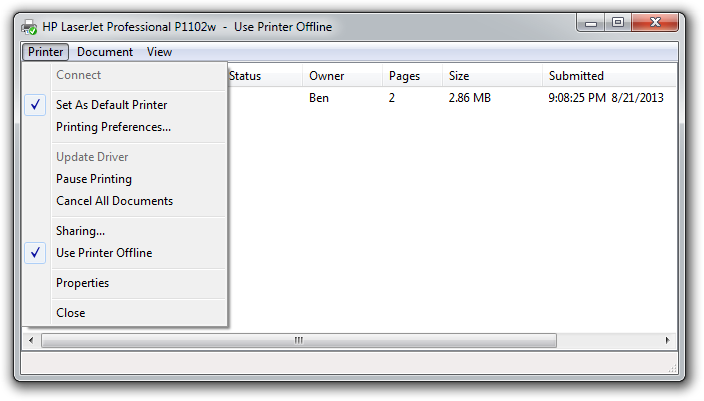
My printer won’t print
Let’s assume that your printer’s drivers are up-to-date, and that it has
enough paper and ink or toner to print. Try turning the printer off and
on. Unplug the printer and plug it back in. Check your printer’s print
queue by looking for the printer icon in the system tray and
double-clicking it. The print queue shows you the status of each job as
well as the general status of your printer.
The print queue is your best bet for troubleshooting printer problems—just make sure that ‘Use Printer Offline’ isn’t selected.
Ensure that ‘Use Printer Offline’ isn’t checked. Sometimes, printing
while your printer is turned off can cause Windows to set your printer
to work offline, and that can stall jobs sent later.
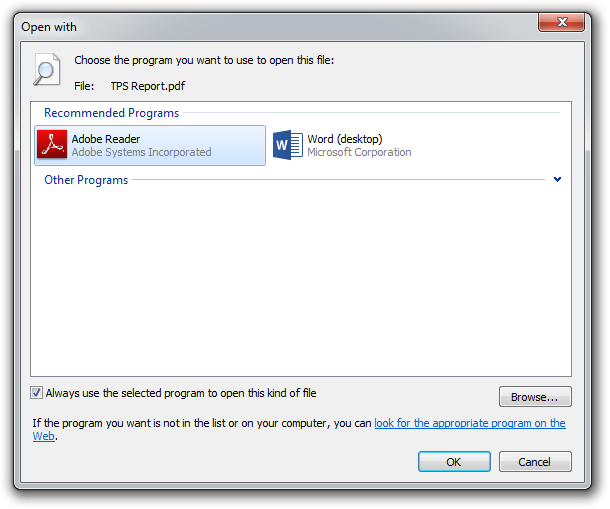
I can’t open email attachments
If you have ever encountered an attachment that you couldn’t open, it
was probably because you didn’t have the software necessary to view the
file.
If you don’t have Adobe Reader or another PDF-compatible program, you won’t be able to open that TPS report.
The usual suspect is the .pdf file, for which you can download a free
PDF reader. If your problem involves a different file format, a quick
search on the attachment’s file extension (the three letters after the
period in the filename) should tell you what type of program you need.
If the attachment lacks a file extension (which might happen if it was
renamed), adding it back should set things right.
My favorite program isn’t working on my new PC
Before you call tech support, make sure that the software you’re trying
to run is compatible with your operating system. Older software might
not function on Windows 8, and an app created for Mac OS X definitely
won’t run on your Windows PC. A 32-bit program might run on your 64-bit
operating system, but it doesn’t work the other way around.
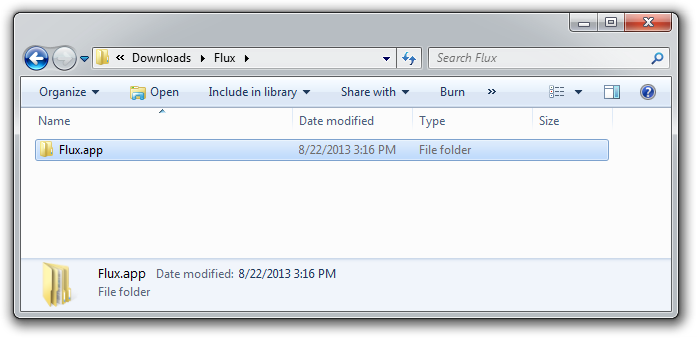
Not all file types work on Windows. For example, files that have the .app extension run exclusively on Mac OS X.
If an online game balks, you might be missing the required plug-ins—Java
and Flash are the usual culprits. Most browsers will alert you to
install these items if necessary.
Replacing
a screen and its invert-er electronics is a tough job that can cost
several hundred dollars and take hours. For an old system, it's likely
not worth it. But if the display is only slightly scratched, it's a
no-brainer to fix it.
After a trip to the beach on a windy day
last summer, I noticed a bunch of small scratches and one big one on the
display of my Intel Classmate PC netbook. The scratches annoyingly
obstructed the screen's image.
My netbook had one big scratch and several small ones.
These types of scratches can be smoothed out with a dab of toothpaste (and I do mean toothpaste -- the gel varieties usually don't have the necessary abrasives) and a little elbow grease.
Gently rub toothpaste into the scratches.
Rub
the toothpaste between your thumb and forefinger and it should feel
slightly sandy and gritty. It's these mild abrasives that will fix the
screen's problem.
Gently rub the toothpaste in a circular motion
over the scratches for a few seconds (not too hard -- you could rub off
the screen's surface coating).
Then wipe the screen clean with a soft cloth.
While the large scratch isn't gone completely, the smaller ones are.
Finish
up by cleaning the screen with a non-ammonia-based window cleaner. My
favorite is Sprayway, but there are grocery store shelves filled with
these products. Look it over and if the scratches aren't gone, repeat
the process.
This strategy isn't perfect. With my netbook, the
toothpaste only partially removed the big scratch, but it did get rid of
all the minor scratches. Plus my netbook now has a minty fresh aroma.
Cost: $15 to $25 Time: 1 hour Materials: Screwdriver, compressed air, replacement fan
A
noisy or broken cooling fan is not only annoying but doesn't bring
enough cooling air into the case, potentially causing the notebook to
overheat and damage the electronics inside. Fortunately, it's not a hard
repair to make. In fact, if you're lucky you may not need to replace
the fan at all.
My Toshiba Satellite Pro 6100 has a single cooling
fan, although many systems, particularly larger gaming and
entertainment systems, have two or more fans to bring in cool air for
the processor, graphics hardware and hard drive. More often than not,
the fans get clogged with dust, debris and dirt, which can make them
noisy and lower their efficiency. If your system is making a whirring or
grinding noise or is overheating, this repair is for you.
Blow compressed air into the slotted grilles.
Before
you do anything else, find the place(s) where fresh air comes in and
hot air escapes -- usually one or more slotted grilles on the side or
bottom of the system. There could be two or three vents, so don't give
up easily. Insert the plastic straw from a can of compressed air into
each vent and blow out all the dust that you can; you might want to put
on a dust mask or have a vacuum cleaner running because there can be a
disgusting amount of dust.
If this doesn't fix things, it's time
to dig in and open the case. There are generally about a dozen screws on
the bottom of the case that you'll need to remove to open the case, but
it varies widely depending on the notebook -- for instance, some models
require you to remove the keyboard to get inside. If it's not
immediately obvious, check your manual or do some online research to
find out how your case opens.
After carefully opening the case, find the fan and blow away any additional dust or detritus.
Open the case and remove any dust or detritus that impedes the fan.
While
you're there, take a good look for anything stuck in the fan's blades
that might be impeding it. Twirl the blade with your finger, and if it
makes noise or doesn't spin freely -- as was the case with my Toshiba --
it needs to be replaced.
Before going further, write down the
model number of the fan and go online to find a replacement fan. Use
your favorite search engine and type in the model number and "cooling
fan." Chances are that even for a five- or six-year-old computer, there
will be fans available from several spare parts stores, such as ComputerTopRepair.com. The replacement should cost anywhere from $5 to $20.
Carefully remove the old fan.
Once
you have the new fan in hand and are sure it's the right one, you can
take out the old fan. First, unplug the fan's power connector. Each
system is different, but you'll probably need to unscrew a frame that
holds the fan in place, and then undo some screws holding the fan to the
frame.
Now you can gently remove the fan. It might take a little
finesse to work the fan loose because it's generally a tight fit in
there. Many notebook fans are connected to the heat pipe, a thin silver-
or copper-colored tube that draws heat off of the processor or graphics
chip. The heat pipe usually snaps or screws into the fan assembly. Try
not to bend the heat pipe when you're removing the fan because that will
reduce its efficiency at cooling the processor.
With the new fan
ready to go, slip it in and carefully screw everything back in place.
Before you screw the bottom of the case back on, plug in the power
connector and fire the machine up. Don't worry if it doesn't start right
away because the fan may turn on only after the system heats up. Once
you've verified that it's working, close the machine up and get to work.
Cost: $15 Time: 2 to 3 hours (20
minutes to set up the repair, 5 minutes to place and shape the putty,
an hour or two to let it cure, 10 minutes to sand it, 30 minutes to
paint it and let it dry)
When
notebooks get dropped, more often than not they land on the corner, one
of the weakest parts of the case. Unless you have a rugged notebook,
there's a good chance that after an encounter with gravity, the corner
will be cracked or -- as was the case with my Toshiba Satellite Pro 6100
-- broken through completely.
It happened in an airport holding pen some time ago when I sneezed
while typing an e-mail. The system went flying and smacked into the
floor. Before I got home, I put a Band-Aid over the damaged area to keep
the elements out. Now it's time to fix it for real.
The secret is to use epoxy putty to fill in the broken part of the case. Epoxy putty is available online
or at any hardware store for around $4 to $6 a tube, so you can even do
this repair on the road. The brand of putty you choose doesn't matter,
but avoid the quick-setting variety because it might harden before
you're done.
First, make sure the damaged area is clean and free of dirt and loose pieces.
Then
it's time to prepare the putty. It comes as a cylinder with two
components wrapped around each other. Just cut a section off and twist
the parts together.
Mix the two putty components completely.
The key to a smooth case repair is to thoroughly mix the two
components together in your hands. Because the putty hardens as the
result of a chemical reaction between the two parts, it's important that
they are completely blended together. You might want to use gloves for
this part because some people are sensitive to the chemicals in the
putty.
Try rolling the putty into a long cylinder and then folding
it over itself several times. After a few minutes, the putty becomes a
uniform white or gray and you're ready.
You'll feel like a kid
working with Play-Doh, and in fact, the putty should be the consistency
of Play-Doh, which is perfect for working it into the damaged area.
Press it firmly into the hole in the case and use your finger or a razor
blade to shape it to follow the contour of the case. When it covers the
area, take the flat side of a razor blade or back of a ruler and
compress the outer surface to flatten it. Any excess putty can be wiped
off the case with paper towel before it dries.
When you like the
way it looks, go do something else for an hour or two until the epoxy is
cured. When it has hardened, the epoxy patch is just as strong as the
plastic case.
Many
DIYers stop here, and use the obvious repair as a road warrior's badge
of honor or conversation starter on road trips. I prefer a little more
finishing, so I smooth the epoxy with 150- and then 220-grit sandpaper.
Then I give it a final sanding with 2,000-grit paper that is slightly
wet to remove any surface scratches.
Naturally, the color doesn't match. If it's a small repair, try using a Sharpie marker to cover it up. For this repair, I used model airplane enamel paint,
which costs about $5 for a small bottle; a full set of colors with
brushes is $10. When it's dry, the repair is done and can only be seen
if you look closely.
We live and work in a cold, cruel world where our laptops take a lot of
abuse. Regardless of how gentle we try to be, it's inevitable that
sooner or later our notebooks will get dropped, spilled on and worse.
While
many people think that notebook damage can be repaired only by the
manufacturer or a computer shop, there are some problems that can be
inexpensively and easily fixed with common tools, spare parts and a
little effort. Many of these repairs are no harder than high school art
projects.
Using a couple of old, beat-up notebooks, I'll show you
how to fix everything from a broken case and frayed charger cord to a
bad fan and scratched screen. Each restoration project has time and cost
estimates as well as what materials you'll need to do the trick. Just
follow the directions I've outlined for each repair -- but be warned,
your system might be a little different or require special parts and a
slightly different approach.
One additional note: While I generally applaud improvisation and
recycling old parts for repairs, there's nothing like having the right
part to do the repair. In fact, while fans and notebook keyboards may
all look alike, they are very different, and chances are the wrong one
won't fit right and work properly. Each repair has links to where you
can get the right parts, but they are just a sample of what's available.
If all else fails, try eBay to get what you need.
Follow along and soon your system will be good as new and ready for its next mishap.
Problem: Frayed charger cord
Cost: $5 to $15 Time: 1 to 2 hours Materials: Silicone sealant, painter's tape (which is less sticky than regular masking tape), protective gloves (optional)
A frayed power cord can be dangerous.
Because a notebook that travels needs to be plugged in and unplugged
several times a day, the cord and connector can take a beating, leading
to a frayed power cord. If this happens, it's important to get a new
cord or fix it right away, because it not only can damage the system's
battery through intermittent charging, but it can also be a fire hazard.
Fortunately,
most power adapters have removable AC power cords, which cost a few
dollars and are available at stores like Radio Shack. On the other hand,
if the connector that plugs into the computer is the problem, it can
cost $50 to $75 to replace because you have to find the exact AC adapter
for your laptop from your notebook manufacturer or an online retailer
such as shop
Or you can just fix it yourself. There's a quick-and-dirty
repair for a frayed cord: Just roll electrical or duct tape over the
damage and hope for the best. A better way is to make a more permanent
repair with silicone sealant, available at any hardware store and many
supermarkets, which will insulate and protect it. It's best to use black
to match the cord's color, but clear sealant works just as well. To
protect the surface you're working on, lay down a wide strip of
painter's tape, sticky side down, and place the frayed area of the cord
on top of it. The sealant won't stick to the back of the painter's tape
the way it might to other barriers made out of paper or plastic, and the
painter's tape should peel right off the table when you're done. (Note,
however, that you shouldn't be doing any kind of computer repairs on your good furniture.) Next,
squeeze out a gob of sealant onto the area that needs fixing. Work the
gooey sealant into place, covering the damage with a liberal coating. If
you have sensitive skin, it's a good idea to wear thin protective
gloves for this part.


